The Image tile can be used for two different use cases:
Displaying an image
Displaying the status of resources, resource groups or subscriptions (just like you can do with the Status tile) on an image background, such as a map.
Tip: If you want to use an image background and display more data than just the health status, like performance metrics and other information, you can use the Surface tile (How to use the Surface tile).
Add a new tile to a dashboard or perspective, choose the Image tile and then click Resources, Resource Groups or Subscriptions depending on what you'd like to display.
Image:
Here you can choose one of the provided images or upload your own. Tip: If you want a different selection of maps, you can download more at https://freevectormaps.com/
Supported image formats: png, jpg, jpeg, gif, tif, tiff. svg, bmp Tip: SVG images resize best since they are vector images.
File size limit: 10MB
Image size: Images fill the size of the tile, which means you can resize the image by adjusting the tile's size. The size of the tile also depends on the screen the dashboard is being viewed on.
Scope: If you want to display status icons on the image, you need to define a scope here. Scoped resources will appear straight away and can be dragged into position.
What you want to select
What to use as a scope
All your Distributed Applications (DAs)
In the advanced section, use a class of either service (system.service) or user created distributed application
Only your Enterprise Applications (EAs)
In the advanced section, use a class of Enterprise Application (Base)
Tip: If you experience any problems with scoping tiles, you'll find FAQs and help in the article How to scope tiles.
Note: By default, results are shown across all subscriptions (unless the subscription option is chosen to specify only one or more subscriptions).
Filter by tenant
By default results are shown across all tenants. In SquaredUp DS 4.7 and above a user who has access to multiple tenants will see a filter by tenant option.
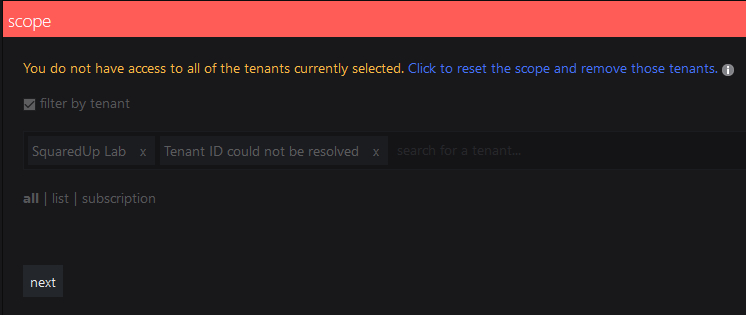
In a multi-tenant environment a user who does not have access to all tenants will see this message if they attempt to edit a scope containing tenants that they do not have access to. This may be because:
One SquaredUp DS admin has added a tile scoped to tenants that other SquaredUp DS admins do not have permissions to.
The customer/tenant is no longer serviced by this Customer Service Provider (CSP), so the tenant has been permanently removed for all SquaredUp DS admins.
Symptoms
A tile scope shows:
"You do not have access to all of the tenants currently selected. Click here to reset which will remove those tenants from the scope."
Tenants the user does not have access to show as:
"Tenant ID could not be resolved"
Procedure
The message warns users that they do not have permissions to all the tenants in the scope.
If the user chooses to reset and therefore edit the scope then the tenants that they do not have access to will be removed. If saved this scope will also have those tenants removed for users who do have access to them.
It is not possible for the user to edit the scope without those tenants being removed from the scope.
Where a tenant has been removed permanently you may wish to reset the scope to remove the unresolvable tenants.
List
List allows you to select several individual items to show.
You can add multiple items. To remove an item click the x to the right of its name.
Tip: Start typing and after two characters you'll see suggestions that match the name appear.
Note: It depends on the tile what happens when you select more than one item. For example, when you select two virtual machines for a Status tile, you'll see the status of those VMs individually. When you select two virtual machines for a Cost Management tile, you'll see the cost for the two VMs added together.
Resource group
Select one or more resource groups.
Filter by type:
Tick filter by type to only show resources of a particular type within the chosen resource group.
Subscription
Select one or more subscriptions from the dropdown box if you wish to restrict results to only one or more subscriptions. When this is not used results are shown across all subscriptions.
Filter by type:
Tick filter by type to only show resources of a particular type within the chosen subscription.
Tags
Select items with a particular tag. Add the tag name and the tag value you want to use to search for. If you select multiple tags, the search automatically 'ANDs' the tags which means the scope only contains items which are tagged with all the tags listed.
Filter by type:
Tick filter by type to only show resources of a particular type within the chosen tag(s).
Type
Scope type can be used to show all resources of a particular type, for example all databases across all subscriptions, by typing databases and selecting SQL databases.
Show hidden types
This works in the same way as the Show hidden types option in the Azure portal.
Hidden types include some ancillary resources which are created/managed by Azure infrastructure. It might be useful to display these resources when cleaning up your resource groups or subscriptions.
Note: If you never used a perspective, you should read Working with perspectives before scoping tiles on perspectives.
The power of perspectives is that tiles on a perspective can use a dynamic scope. A dynamic scope considers the currently viewed resource. A dynamic scope consists of two different states:
the configuration of the scope in the tile (for example, "consider child objects of type logical disk for the currently viewed object")
the actual resolved scope that depends on which resource you are currently viewing ("this object has 5 child objects of type logical disk")
After configuring the dynamic scope once in the tile, you'll get different results depending how the scope is resolved on the different resources you are viewing.
On perspectives, you can scope tiles to:
this resource (only on perspectives for resources)
The tile's scope will be the resolved to the resource that is currently viewed.
child resources (only on perspectives for resource groups and subscriptions)
When you select this option, the scope of the tile will be resolved to all resources that are in the group or subscription that is currently viewed.
If you want to narrow the scope down to a specific type of resource in the group or subscription, you can filter for one specific type of resource.
other resources
Gives you the normal, non-dynamic scope options you are used to when scoping tiles on dashboards. This means the tile will not dynamically adapt it's content to the currently viewed resource, it will always show data for the static resource picked here.
Since the power of perspectives is that their tiles can show data for different resources depending on what resource is currently being viewed, you should only select this option when you are sure that there is no relationship between the desired scope and the currently viewed resource.
Icons:
Here you can customize the icons on the image:
You can change the size of the icons with the slider
You can change the shape of the icons (square or circle)
You can drag the icons on the image into position
Label:
none
Use no label
name
Use the object's name
path / name
Use the object's name and path
name (path)
Use the object's name and path
custom
Here you can change the label to a custom label. You can use static text and dynamic properties. Use the mustache picker to select dynamic properties from the response data to use them as labels.
Property names that contain hyphens (for example properties.name-with-hyphens) can't be processed due to a JavaScript limitation. If you want to use a property that contains a hyphen, you have two options:
If you have access to the data source and can change the name of the property, change the name of the property to a name without hyphens. For example, if your Elasticsearch query uses a property (an aggregation, a grouping or any other property you want to use) with a name that contains a hyphen, you can either access your Elasticsearch instance and change the name there or you can overwrite the name in the query dsl field.
If you can't change the name of the property, you need to enter the property name in the following format: Original property name: {{properties.name-with-hyphens.value}} New format: {{properties['name-with-hyphens'].value}}
Click done to save the tile.
The tile now shows data according to your settings.