How to use Custom Labels
Custom labeling allows you to specify exactly how you want resources to be displayed, using both static text and dynamic properties.
Supported tiles
Tiles that support custom labels come preconfigured with some useful labels and, in the case of Performance tiles, will even attempt to automatically select the most useful label based on the selected resource and metric. You can however choose the custom option which will allow you to precisely control the label.
The following tiles support custom labels:
- Status
- Performance (Bar, Line graph, Sparklines)
- Matrix
- Image
- SQL (Grid)
- Web API (Grid)
- Azure Log Analytics (Grid)
- App Insights (Grid)
You can configure a custom label by configuring the label panel when creating or editing a supported tile.
Mustache Parameters
Custom labels can use Mustache parameters (mustache syntax) to insert properties. If you're familiar with mustache, you can specify advanced labels that can transform properties prior to displaying them (such as showing only a portion of text, converting a number or reformatting a date).
A mustache parameter is a dynamic value, the actual value will be inserted to replace the field in curly braces. For example, {{timeframe.start}} will insert the start time based on the timeframe configured within the tile, or {{name}} will insert the name of the object(s) in scope.
Check out our GitHub Samples repository for samples around using mustache. You'll find snippets for custom labels, conversions, manipulating strings, using HTML, and many more use cases.
For example you can use the javascript split method to separate properties into substrings to make the result more readable.
The mustache helper
When specifying a mustache for a custom label, clicking the {{}} button or typing {{ brings up a helpful picker which shows all the properties of your selected resources, along with sample values.
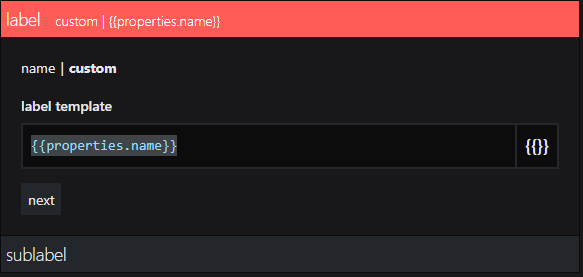
Once the mustache helper is displayed, the list of properties will automatically filter based on what you type, allowing you to quickly find a property using a partial name or likely term. Clicking an item in the list will automatically insert that property into your label and complete the mustache.
Property names are case-sensitive and should be written as they appear in the mustache helper (e.g. availabilityStatus.location not AvailabilityStatus.location).
Note about using properties with hyphens from external APIs (for Web API, Elasticsearch, and Splunk tile)
Property names that contain hyphens (for example properties.name-with-hyphens) can't be processed due to a JavaScript limitation. If you want to use a property that contains a hyphen, you have two options:
- If you have access to the data source and can change the name of the property, change the name of the property to a name without hyphens.
For example, if your Elasticsearch query uses a property (an aggregation, a grouping or any other property you want to use) with a name that contains a hyphen, you can either access your Elasticsearch instance and change the name there or you can overwrite the name in the query dsl field. - If you can't change the name of the property, you need to enter the property name in the following format:
Original property name:{{properties.name-with-hyphens.value}}
New format:{{properties['name-with-hyphens'].value}}
Display virtual machines with a custom sub-label
You may wish to specify your own sublabel rather an use the default resource summary sublabel.
- Create a Status resources (icons) tile.
- On the scope panel select type and enter
Virtual Machines. - Click on the sublabel panel.
- Click on custom.
- In the sublabel template paste in
{{location}} {{properties.storageProfile.imageReference.offer}} {{properties.storageProfile.imageReference.sku}}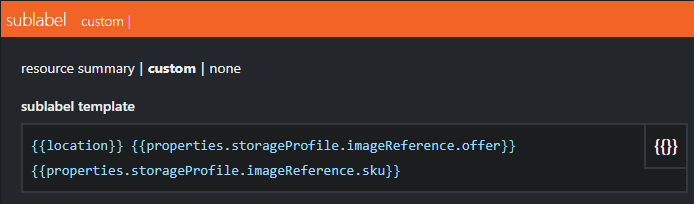
- Click on done.
Using Timeago to convert Unix timestamps
You can use timeago to convert Unix timestamps from milliseconds to show a readable date and time. You can either display an absolute time (for example, August 20th 2021) or a relative time (for example, 20 hours ago).
There are four parameters you can use for converting the time, written in the following format:
timeago(Value you want to convert, Show Absolute, Show Time, Without Suffix, With Prefix).
The parameters for the value you want to convert can either be true or false:
Show Absolute | true = show absolute time (date) rather than relative timefalse = show relative time |
Show Time | true = if showing absolute time, show the time as well as the datefalse = do not show the time with the date |
Without Suffix | true = if showing relative time, this removes the "ago"false = "ago" at the end will be shown (e.g. 10 hours ago) |
With Prefix | true = adds "since" ahead of the absolute time, or "for" ahead of the relative timefalse = no prefix will be shown |
Tip: The default setting for all parameters is false. If you only want to change the first parameters, you can just use timeago(value, true, true) and it will be interpreted as timeago(value, true, true, false, false).
Examples:
To display the relative time (how long ago something occurred):
{{timeago(value)}}To display the absolute time as the date without the time:
{{timeago(value, true)}}To display the absolute time as the date with the time:
{{timeago(value, true, true)}}To display the time with the prefix "for" for relative time and "since" for absolute time (for example, "the status has been unhealthy for 10 hours")
Option A) Use the fourth parameter and set it to true. This will insert the appropriate prefix for the absolute or relative time:
timeago(value, false, false, true, true)Option B) You can leave out the fourth parameter that controls if the prefix "for" or "since" is inserted automatically. Since you left it out, it defaults to false, causing no prefix to be shown. Instead you insert the word "for" or "since" manually before the timeago function.
for timeago(value, false, false, true)To convert a time value from seconds to milliseconds:
Some APIs, like Pingdom for example, return the value in seconds. Since Timeago uses the time value in milliseconds, you need to multiply by 1000 in that case:
{{timeago(value*1000)}}Example with a Pingdom property:
{{timeago(properties.lasttesttime*1000)}}