How to install SquaredUp DS for Azure using the installer
SquaredUp DS for Azure came to its end-of-life on 26th September 2024 and is no longer maintained. Existing customers can still renew and support will continue until further notice.
We recommend that you sign up to SquaredUp Cloud. If you have yet to sign up, create a free account here and find out more here.
This articles covers how to install SquaredUp DS for Azure for the first time using the installer.
If you have an earlier version of DS for Azure already installed, then the installer will upgrade your installation, see How to upgrade SquaredUp DS for Azure
SquaredUp DS for Azure can be installed on any Windows Server VM or on-prem machine. The setup application will automatically install IIS and any other prerequisites, so the only dependency is that the server will need internet access to Azure.
The location of the SquaredUp DS server has no bearing on the Azure resources you will be able to see and dashboard in SquaredUp DS. You will be able to select the relevant Azure tenant during the setup process.
As Internet Explorer is not supported, check that another browser is set as the server's default browser (search Windows > default apps).
Here is what we recommend:
Ideally provision a new server dedicated to hosting SquaredUp DS
SquaredUp DS has a number of prerequisites that will be automatically installed by the setup process (e.g. the IIS Web Server role)
A read-only Azure application in your Azure AD that will populate your dashboards by querying Azure APIs.
The installer makes some changes to Azure Active Directory to give SquaredUp DS permission to access the Graph API. These steps occur automatically. To read about what modifications are made during setup and why please see Reference - Azure Active Directory modifications.
Run the installer .exe on the machine that you want to be your SquaredUp DS server.
Click Next
Accept the License Agreement and click Install. Prerequisites will be installed if not installed already. A restart of the server may be required. If your server has restarted the install should resume when the server restarts, but you may need to click Deploy SquaredUp DS for Azure from the Start menu.
Check the deployment type says New installation and click Next. If the installer detects a version of DS for Azure is already installed then it will default to an In-Place upgrade, meaning that it will upgrade the current DS for Azure instance. See How to upgrade SquaredUp DS for Azure.
Check the installation details and click next.
SquaredUp DS can be installed in two different layouts:
As an application as a subfolder of the Default Web Site. This is the default installer layout.
At the website root, this layout is used to deploy SquaredUp DS to a dedicated web site.
Application
The default installer layout is Application and the physical path is configured as a subfolder of the Default Web Site. The SquaredUp DS installer will create the application and app pool automatically based on the information that is provided, assuming that the Default Web Site exists.
While the physical path in this configuration does not necessarily need to be a subfolder of the web site’s physical path, it must not be set to the same path as the web site. For instance, if the Default Web Site’s physical path is C:\inetpub\wwwroot as shown in the screenshot below, then the Physical disk path set in the SquaredUp DS installer would typically be C:\inetpub\wwwroot\SquaredUp. It must not be C:\inetpub\wwwroot as this would cause SquaredUp DS to exhibit unexpected behavior.
This layout should also be selected if SquaredUp DS is to be installed as an Application underneath a website other than the Default Web Site. As is the case with installing to the Default Web Site, the target web site must already exist in IIS. Update the Website field on the Paths tab of the installer to match the target web site name and set the Physical disk path field to an appropriate path, ensuring that this path is different to the target web site’s physical path.
Website root
The Website root layout is used to deploy SquaredUp DS to a dedicated web site. In this instance, the Physical disk path will match the web site’s physical path. The SquaredUp DS installer will create the web site and application pool automatically using the information provided, so there is no need to manually create the web site prior to installing SquaredUp DS.
Setting the Pool Identity
With the layout selected, the log on account for the SquaredUp DS app pool can be configured. By default this is set to Network Service, but it can be changed to a domain account if needed:
Optionally, the SCOM server address can be entered into the installer at this point, but this information is also requested later on in the installation wizard.
Enter your Azure Tenant ID and confirm the Redirect URI on the Configure SquaredUp DS for Azure screen. Azure Tenant ID: You can find your tenant ID from the Azure portal: Azure Active Directory > Tenant ID and clicking the Copy to clipboard button. Before proceeding you must check and confirm the Redirect URI. The Redirect URI: This should be the address using the fully qualified domain name (FQDN) that you will use to access DS for Azure once deployed. By default the machine name you are installing on is shown, but you may need to add or change the domain details to ensure that this is the correct FQDN. If you have another address that you use to browse to SquaredUp for Azure, for example in your bindings, in DNS or via your load balancer, you should use this. This can be changed at a later date (How to change the hostname / domain).
Click Next or Deploy.
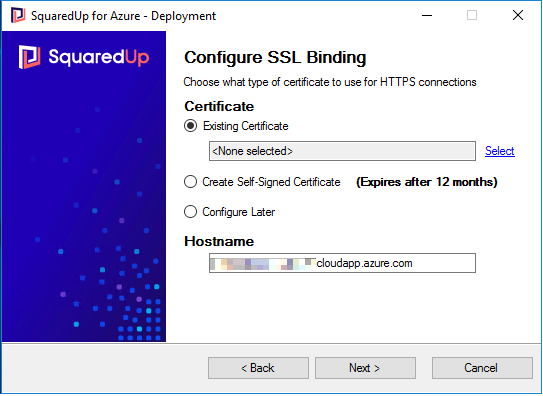
If SSL is not already configured for the chosen website, then the Configure SSL Binding page will appear. You will need to choose how you want to configure the SSL certificate. DS for Azure will only work using HTTPS.
Existing Certificate
Use this option to choose an existing SSL certificate.
Create Self-Signed Certificate
The installer will create a new self-signed certificate, set to expire after 12 months.
Configure Later
While you can choose to configure the certificate later, please note that DS for Azure will not work until HTTPS is configured with a SSL certificate.
Clicking Finish at the end of the installation will open SquaredUp DS for Azure in a browser.
If you deployed SquaredUp DS from the Azure Marketplace:
The URL is https://DNSName of the virtual machine (VM) deployed.
If DS for Azure does not open automatically, you will need to correct the URI (see How to change the hostname / domain) and then you must browse to this address to run the SquaredUp DS setup wizard.
If the browser appears blank when browsing to SquaredUp DS, ensure the server's default browser is not set to Internet Explorer, which is no longer supported. To check your default browser, search Windows > default apps.
SquaredUp DS works best with the latest versions of Edge, Chrome, Firefox and Safari on desktop & mobile.
Internet Explorer is not supported on SquaredUp DS v5 and above. Older browsers may show a blank page.
On SquaredUp DS v4 Internet Explorer 9 and earlier versions are not supported.
Before you can get started, SquaredUp DS for Azure has to complete some final configuration of your environment, such as activating your license and Azure AD authorization.
If you are not able to log in with an account that is an Azure Active Directory global admin account, or an account that can deploy applications to Azure Active Directory (AD), you will not be able to complete the setup wizard. You can ask a global admin user to run the wizard or to follow the article: How to manually configure SquaredUp DS for Azure.
Browse to SquaredUp DS for Azure and the SquaredUp DS setup wizard will appear.
Click the Setup button to configure the Azure Active Directory.
Next we need to add the SquaredUp DS setup application to Azure AD. This application is created using the Microsoft device login process and impersonates the current user.
During the setup process you will be prompted to grant permissions to SquaredUp DSAzure Setup to use permissions from your Azure and Microsoft accounts.
Explanation
In order to access Azure data and authenticate users, your SquaredUp server will need its own unique AD application specific to your Azure tenant.
The SquaredUp DS Azure Setup application obtains the permissions necessary to automatically create such an AD application:
The Azure Setup AD application is added to your Azure tenant
The setup wizard uses the application's permissions to create a new AD application unique to your SquaredUp server
The SquaredUp server uses its unique AD application to access Azure data and perform user authentication
Permissions requested
This setup application requests the following permissions from whomever logs into their Microsoft account during the setup process:
Access to the directory as the current user
Impersonation of the current user to access Azure service management
Sign in and read the profile of the current user
These are the permissions required to create a subsequent AD application for the SquaredUp server.
Granting consent for your organization is unnecessary unless you want to set up multiple SquaredUp servers.
Permission removal
Once SquaredUp DS has been set up, you are free to delete this application ("SquaredUp DS for Azure Setup") from your directory by using the Azure portal.
In the portal this application is typically visible in the "Enterprise Applications" blade.
This application is only used to setup SquaredUp DS and does not affect its operation. It ceases to have any permissions within your tenant as soon as it is removed.
You will see the message Awaiting authorization... and should follow the steps as described below.
Click the copy link to copy the authorization code.
Click on the URL on the screen (in step two) which opens the address in a new tab.
Paste in the copied code and click next.
On the Microsoft Sign in or Pick an account screen login with the Azure AD admin account you wish to use to deploy the SquaredUp DS setup application. You may need to ask a global admin user to run the wizard or to follow the article: How to manually configure SquaredUp DS for Azure. or
Close this tab when you see the message confirming that you have signed in to the SquaredUp DS for Azure Setup application.
Return to the tab showing the SquaredUp DS setup screen. After a few seconds it should say that SquaredUp DS is correctly configured for Azure AD Authentication.
You will see the message 'Starting...' and then a Microsoft screen Permissions requested. Tip: Copy the name of the SquaredUp Enterprise Application with its GUID and save it for later use. If you have several SquaredUp DS instances it may be useful later to paste this in to the Azure portal when configuring Open Access or making users SquaredUp DS administrators. A privileged user will see a checkbox to 'Consent on behalf of your organization'. Enabling this will grant these permissions for all users and disable this dialog for future first time logins.
The setup application creates an enterprise application specific to your current server. If you deployed via Marketplace the application is named in the form SquaredUpAzure on <hostname>. If you used the installer the application is named in the form SquaredUpAzure<GUID>.
This is the application that the SquaredUp DS web application uses to authenticate users. Each user that logs into SquaredUp DS shares the following permissions with the SquaredUp server:
Impersonation of the current user to access Azure service management
Reading all directory data
Reading all groups
Sign in and read the profile of the current user
Read all user's basic profiles
All of these permissions are delegated: SquaredUp DS cannot make use of them if the signed in user does not already have them.
Let's Encrypt is a trademark of the Internet Security Research Group. All rights reserved.
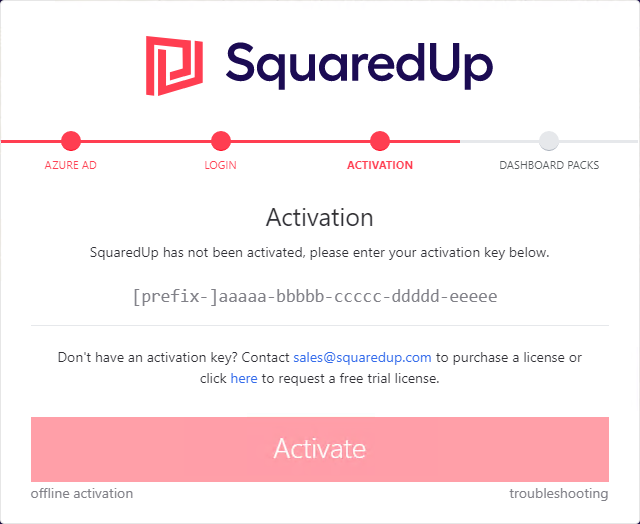
Click Accept to allow SquaredUp DS to access Azure as you. You will be returned to the SquaredUp DS setup wizard at the Activation screen.
Paste in your activation key, and click Activate. You will have received your activation key by email following your purchase or free trial.
Click Import to install the default dashboards and perspectives. SquaredUp DS for Azure will then open.
The newly-created SquaredUp DS Azure enterprise application will now need to be modified in order to assign the "SquaredUp DSAdministrator" role to the relevant users (or groups) that will administer SquaredUp DS, see How to make a user a SquaredUp DS administrator. If this is not completed then only the account that deployed SquaredUp DS will be able to manage SquaredUp DS.
Give dashboard authors permission to create dashboards. A SquaredUp DS administrator will need to give users or groups author permission to a Team Folder, within which they can create and edit dashboards. See Team Folders
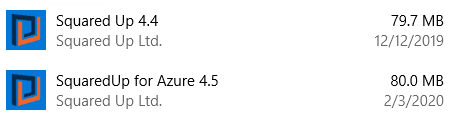
If you upgraded from DS for Azure v4.4 to v4.5 you will see two 'Deploy SquaredUp' tools on the Windows Start menu. You should use the v4.5 'Deploy SquaredUp For Azure' deploy tool, and ignore the older 'Deploy SquaredUp' tool.
The Deploy tool is added by the installer and allows you to jump into the installer to the point where you can deploy an instance of SquaredUp DS. It is used if your server had to restart during the installation and the installer didn't restart automatically. It can also be used to deploy further instances of that version of SquaredUp DS.
'Deploy SquaredUp for Azure' - this is the deploy tool for SquaredUp DS v4.5 and is the one you should use.
'Deploy SquaredUp' - this is the deploy tool for SquaredUp DS v4.4, which you can ignore.
If you wish to install a further instance of DS for Azure you can run the deploy tool from Start > SquaredUp for Azure > Deploy SquaredUp for Azure.
Many license keys only allow one activation, so you may need to contact SquaredUp Support
If you upgraded from DS for Azure v4.4 to v4.5 you will see two uninstallers for DS for Azure:
SquaredUp 4.4
SquaredUp for Azure 4.5
To remove all instances of DS for Azure you should run the 4.5 uninstaller first, then the 4.4 uninstaller. This will clean up the files from the v4.5 installation and the old v4.4 installation location.
Symptoms
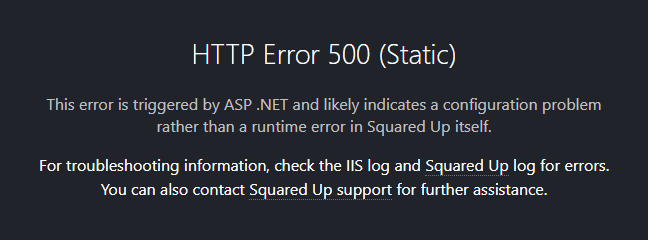
You are using multi-factor authentication (MFA) and users see this error when trying to log in to SquaredUp DS:
HTTP Error 500 (Static)
"This error is triggered by ASP.NET and likely indicated a configuration problem rather than a runtime error in SquaredUp itself"
Procedure
This error can be caused by using multi-factor authentication (MFA) for the Microsoft Azure Management application.
The solution is to create a similar Conditional Access policy requiring multi-factor authentication for the SquaredUpAzure enterprise application (or, if preferred, to add the SquaredUpAzure enterprise application to the existing Microsoft Azure Management MFA Conditional Access policy).
If configuration fails, a large volume of diagnostic text will be produced, followed by a red failure message. If you experience this, please contact SquaredUp Support
Note that the diagnostic text may reveal sensitive details - such as your username, installed AD applications and IDs. Please be conscious of this when sending us details - for example, it is not appropriate to send us this text over email.
During the setup process you will be prompted to grant permissions to SquaredUp DSAzure Setup to use permissions from your Azure and Microsoft accounts.
Explanation
In order to access Azure data and authenticate users, your SquaredUp server will need its own unique AD application specific to your Azure tenant.
The SquaredUp DS Azure Setup application obtains the permissions necessary to automatically create such an AD application:
The Azure Setup AD application is added to your Azure tenant
The setup wizard uses the application's permissions to create a new AD application unique to your SquaredUp server
The SquaredUp server uses its unique AD application to access Azure data and perform user authentication
Permissions requested
This setup application requests the following permissions from whomever logs into their Microsoft account during the setup process:
Access to the directory as the current user
Impersonation of the current user to access Azure service management
Sign in and read the profile of the current user
These are the permissions required to create a subsequent AD application for the SquaredUp server.
Granting consent for your organization is unnecessary unless you want to set up multiple SquaredUp servers.
Permission removal
Once SquaredUp DS has been set up, you are free to delete this application ("SquaredUp DS for Azure Setup") from your directory by using the Azure portal.
In the portal this application is typically visible in the "Enterprise Applications" blade.
This application is only used to setup SquaredUp DS and does not affect its operation. It ceases to have any permissions within your tenant as soon as it is removed.
The setup application creates an enterprise application specific to your current server. If you deployed via Marketplace the application is named in the form SquaredUpAzure on <hostname>. If you used the installer the application is named in the form SquaredUpAzure<GUID>.
This is the application that the SquaredUp DS web application uses to authenticate users. Each user that logs into SquaredUp DS shares the following permissions with the SquaredUp server:
Impersonation of the current user to access Azure service management
Reading all directory data
Reading all groups
Sign in and read the profile of the current user
Read all user's basic profiles
All of these permissions are delegated: SquaredUp DS cannot make use of them if the signed in user does not already have them.
Let's Encrypt is a trademark of the Internet Security Research Group. All rights reserved.