A perspective looks like a dashboard, but while a dashboard gives you an overview about all your resources a perspective gives you details about a specific resource. Each perspective contains data about a specific aspect of the resource. For example, an SQL database will have perspectives like SQL Database, Resource, Alerts and Cost, each of them containing data about this specific aspect of the SQL database. Which perspectives are available depends on what kind of data is useful for this type of resource. You can edit the perspectives to customize them to your needs and you can also create new perspectives.
Perspectives use the same tiles as a dashboard, but they show data in the context of the specific resource they are focused on.
The power of perspectives is that tiles on a perspective can use a dynamic scope. A dynamic scope considers the currently viewed resource. A dynamic scope consists of two different states:
the configuration of the scope in the tile (for example, "consider child objects of type logical disk for the currently viewed object")
the actual resolved scope that depends on which resource you are currently viewing ("this object has 5 child objects of type logical disk")
After configuring the dynamic scope once in the tile, you'll get different results depending how the scope is resolved on the different resources you are viewing.
The overall health state (if available) of the resource is shown directly in the title
You can easily switch between perspectives for the same resource to get all the information you need.
a subscription
a resource group
a single resource like a VM
an alert
Where do I find perspectives?
Perspectives are only visible on the drilldown of a resource. You can get to a drilldown by searching for the resource or, when you are on a dashboard, by clicking on data about that resource in one of graphs on the dashboard. On the drilldown, you'll see the perspective ribbon below the resource's name which contains all the different perspectives that are available for this resource.
Perspective ribbon:
Tip: You can also add perspectives to the navigation bar to create a shortcut to a specific perspective (see Pinned Perspectives).
Managing Perspectives
Unpublished perspectives are shown on System > Unpublished.
What are pinned perspectives?
A 'pinned perspective' is a perspective that has been added to the navigation bar (available in v4.5 and above).
Pinning a perspective to the navigation bar creates a handy shortcut to a perspective for a specific resource. Usually, you first need to navigate to the specific resource to be able to choose which perspective you want to see. By pinning the perspective to the navigation bar, you can go to one specific perspective directly.
Note: A pinned perspective is one perspective for one specific resource. Even though a perspective can be available for different resources of the same type, pinning a perspective does not mean you pin the perspective to the navigation bar and then choose the resource you want to see. The pinned perspective will be about the one resource you were viewing when you pinned the perspective.
For more use cases of pinned perspectives and how to create them see Pinned Perspectives.
What are suppressed perspectives?
A suppressed perspective is hidden from the perspective ribbon by default. The perspective is still available for the resource but users have to click on the arrow button in the perspective ribbon to see it. Suppressing perspectives is helpful to keep the perspective ribbon nice and tidy.
Suppressing a perspective does not change the target, which means the resource still has to match the target for the perspective to be available on the ribbon bar. If it does, the criteria for the suppressed perspective determine if the perspective is visible directly or hidden behind the arrow button.
Note: Only SquaredUp DS Admins can create and edit perspectives. This applies also to pinned perspectives in Team Folders. While a normal dashboard in a Team Folder can be edited by users when they have the author or owner role for the Team Folder, a pinned perspective in a Team Folder can't be edited by users, even if they have the author or owner role, since editing a perspective affects all resources of the same type.
If you want to create a new perspective: You first need to decide which resources the perspective will apply to: After you navigate to the correct resource, resource group, or subscription you need to click on the + button on the perspective ribbon. If you want to edit a perspective: Go to one of the resources, resource groups or subscriptions that contain the perspective, choose the perspective from the perspective ribbon and click on the edit button.
If you want to create a perspective that only applies to one specific resource, resource group, or subscription you need to navigate to that specific resource, resource group, or subscription.
If you want to create a perspective that applies to all resources no matter their type or all resources of a specific type, you can navigate to any resource, but not to a resource group or subscription.
If you want to create a perspective that applies to all resource groups, you can navigate to any resource group, but not to a resource or subscription.
If you want to create a perspective that applies to all subscriptions, you can navigate to any subscription, but not to a resource or resource group.
Creating or editing perspectives consists of three parts:
Defining the settings for the perspective
Configuring the tiles on the perspective
Publishing the perspective to make it available
Defining the settings for the perspective Tip: If the settings section is hidden, click on the settings button at the top right of the page to make the section visible again.
Title
The title of the perspective is the name that will be shown in the perspective ribbon.
Choose a title that is appropriate for this perspective. A perspective often applies to different resources so the title should not be specific to one resource in that case.
Target
The target of a perspective determines two things:
for which set of resources the perspective will be visible in the perspective ribbon
which set of resources will be used for the dynamic scope of the tiles Note about the relation between the perspective's target and the scope of the perspective's tiles: Usually, when you create tiles on a perspective you use a dynamic scope for them that adapts to the currently viewed resource. When you define a perspective's target, you define for which resources the perspective will be available. Since the target determines the resources that can be viewed and the currently viewed resource determines how the dynamic scope is resolved, the target directly affects the scope of those tiles.
this resource only
The perspective will only be visible for the one specific resource you picked, for example one specific VM. This means the perspective won't be visible for any other resources.
Choose this option if you want to create a very specific perspective that is only relevant to one specific resource.
all resources
The perspective will be visible for all resources, no matter their type.
Choose this option if you want to create a very broad perspective that is relevant for every resource.
Resources of type
The perspective will be visible for resources of the specified type. For example, by choosing SQL databases the perspective will be shown for all SQL databases. This option is not shown for resource groups or subscriptions.
Suppress this perspective
Here you can choose the criteria for when the perspective should be suppressed.
A suppressed perspective is hidden from the perspective ribbon by default. The perspective is still available for the resource but users have to click on the arrow button in the perspective ribbon to see it. Suppressing perspectives is helpful to keep the perspective ribbon nice and tidy.
Suppressing a perspective does not change the target, which means the resource still has to match the target for the perspective to be available on the ribbon bar. If it does, the criteria for the suppressed perspective determine if the perspective is visible directly or hidden behind the arrow button.
this resource only
Suppresses the perspective only for the one resource you are currently looking at.
all resources
Suppresses the perspective for all resources, no matter their type.
Graph colors
Graph color matching means that one item (a specific resource, object, site, anything you are displaying in your graphs) is shown in the same color in different graphs on one dashboard or one perspective.
Configuring the tiles on the perspective The main difference between configuring tiles on dashboards and on a perspective is the scope option.
The power of perspectives is that tiles on a perspective can use a dynamic scope. A dynamic scope considers the currently viewed resource. A dynamic scope consists of two different states:
the configuration of the scope in the tile (for example, "consider child objects of type logical disk for the currently viewed object")
the actual resolved scope that depends on which resource you are currently viewing ("this object has 5 child objects of type logical disk")
After configuring the dynamic scope once in the tile, you'll get different results depending how the scope is resolved on the different resources you are viewing.
On perspectives, you can scope tiles to:
this resource (only on perspectives for resources)
The tile's scope will be the resolved to the resource that is currently viewed.
child resources (only on perspectives for resource groups and subscriptions)
When you select this option, the scope of the tile will be resolved to all resources that are in the group or subscription that is currently viewed.
If you want to narrow the scope down to a specific type of resource in the group or subscription, you can filter for one specific type of resource.
other resources
Gives you the normal, non-dynamic scope options you are used to when scoping tiles on dashboards. This means the tile will not dynamically adapt it's content to the currently viewed resource, it will always show data for the static resource picked here.
Since the power of perspectives is that their tiles can show data for different resources depending on what resource is currently being viewed, you should only select this option when you are sure that there is no relationship between the desired scope and the currently viewed resource.
There are detailed articles for each of the different tiles, that take you through all the configuration options and a walkthrough to get you started.
For more information about how to configure each tile type see the list of tile articles here:
Publishing the perspective The new or edited perspective will be saved as a draft. You can identify a draft by two indicators: To publish the new or changed perspective click the unpublished changes button at the top of the screen, then click publish to make the changes live.
There's (DRAFT) written after the perspective's name in the perspective ribbon
There's an unpublished changes button next to the resource's name
You can navigate to a dashboard, perspective, or pinned perspective, click the edit button and then click the delete button.
Note: If you are deleting a pinned perspective, you only delete the pinned perspective, not the original perspective.
Note about the discard button:
If a dashboard or perspective is not published yet (draft), the discard and discard changes buttons will delete it.
If the dashboard or perspective has been published, and then you make changes, discard will discard the changes and leave the previously published dashboard or perspective live.
If you unpublish a dashboard or perspective and then discard changes then the dashboard or perspective will be deleted.
More options to delete a dashboard or pinned perspective
Note: These options only work for dashboards and pinned perspectives, not for perspectives. If you delete a pinned perspective, only the pinned perspective will be deleted, not the original perspective.
Other options to delete a dashboard or pinned perspective are:
You can delete the dashboard or pinned perspective from the navigation bar. Deleting it from the navigation bar will delete it completely, not just from the navigation bar.
The global navigation editor is accessible only by SquaredUp DS administrators (How to make a user a SquaredUp DS administrator) from the right-hand menu ☰ > edit navigation or system > dashboards.
This allows SquaredUp DS administrators to reposition globally viewable folders and Team Folders on the navigation bar, as well as the ability to move any globally viewable dashboards.
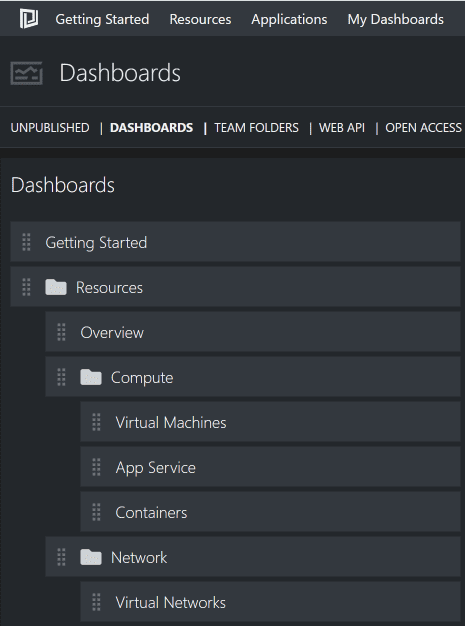
Globally viewable (normal) dashboards are shown simply by the dashboard name.
Globally viewable folders (normal folders that appear on the navigation bars for everyone) are shown by a folder icon:
Team folders are shown with this icon:
Managing the dashboards within Team Folders is done from the Team Folder settings page.
Click on the dashboard 'handle' to drag it to a new position, for example, drag it to the right to move it into a subfolder.
Reordering content is saved automatically and any changes are instantly reflected.
There are 3 icons across different elements of the navigation editor when hovering on a folder:
The edit team folder icon is shown next to Team Folders and clicking it will take you to the Team Folder settings page where you can view and sort the dashboards within the Team Folder.
The view folder button takes you to the folder itself to view or edit that folder.
The delete button will delete items. This deletes the dashboard or folder and sub-contents completely, not just from the navigation bar. (Admin users can restore deleted dashboards and perspectives from the Recycle Bin
If the dashboard or pinned perspective is in a folder, you can go to the folder settings , click the edit button, and delete it from the folder. Deleting it from the folder will delete the dashboard, not just from the folder. Admin users can restore dashboards and perspectives, see Recycle Bin
This walkthrough will guide you through creating a new perspective using a specific example.
In the first walkthrough, we are going to create a perspective with a Cost Management tile treemap for a subscription. In the second walkthrough, we are going to create a new perspective with a tile for a resource.
In this walkthrough we are going to create a perspective to show a Cost Treemap for a subscription.
In SquaredUp DS browse to a subscription. For example, Overview > Subscriptions and click on one of the subscriptions shown. As the menu structure is completely customizable this may be different in your environment, so you may prefer to use the search at the top right.
On the perspective ribbon click the plus button to add a new perspective. The plus button on the navigation bar allows you to create a dashboard or a folder. To create a perspective you want the plus button on the perspective ribbon.
When you create a new perspective the perspective settings are opened straight away. Give your new perspective a title.
To make this perspective show for all subscriptions, leave the target set to all all subscriptions. If you select this subscription only then this new perspective will only be shown for the subscription you are viewing now. The Suppress this perspective (hide by default) option can be used to hide a perspective from a subset of resources. We won't use this for this walkthrough.
Close the perspective settings by clicking the cross at the top of the section.
The new tile section is open by default. Click the Cost Management tile icon.
Click on the Treemap tile.
In the scope section click on child resources. This means that the tile will show the cost details of all the resources in the subscription being viewed.
In the color section click on type. When you hover on a virtual machine for example, the other virtual machines will be highlighted.
Click done.
If you want to make this the default perspective shown when users browse to a VM you can drag your new perspective to the far left-hand side of the perspectives bar.
To make this new perspective available to other users you would click the publish button at the top of the screen.
Browse to a different subscription and check that your new perspective is shown where you want it to be.
In this walkthrough we are going to create a perspective to show details for a VM.
In SquaredUp DS browse to a VM you wish to create a perspective for. For example, Resources > Computer > Virtual Machines and click on one of the VMs at the bottom of the page. As the menu structure is completely customizable this may be different in your environment, so you may prefer to use the search at the top right.
On the perspective ribbon click the plus button to add a new perspective. The plus button on the navigation bar allows you to create a dashboard or a folder. To create a perspective you want the plus button on the perspective ribbon.
When you create a new perspective the perspective settings are opened straight away. Give your new perspective a title.
Now we are going to set the target for the new perspective. If you select this resource only then this new perspective will only be shown for the resource you are viewing now. If you select all resources then every resource you view in SquaredUp DS will show this perspective. If you choose resources of type then all resources of the type you specify will show this perspective. To make this perspective show for all VMs, choose resources of type, enter virtual and select Virtual machines from the drop down list. The Suppress this perspective (hide by default) option can be used to hide a perspective from a subset of resources. We won't use this for this walkthrough.
Close the perspective settings by clicking the cross at the top of the section.
The new tile section is open by default. Click the Matrix tile icon.
In the scope section click on this resource. This means that the tile will show details of whichever VM you happen to be viewing with this perspective.
Click done.
If you want to make this the default perspective shown when users browse to a VM you can drag your new perspective to the far left-hand side of the perspectives bar.
To make this new perspective available to other users you would click the publish button at the top of the screen.
Browse to a different virtual machine and check that your new perspective is shown where you want it to be: Resources > Computer > Virtual Machines and click on one of the VMs at the bottom of the page.
The title of the perspective is the name that will be shown in the perspective ribbon.
Choose a title that is appropriate for this perspective. A perspective often applies to different resources so the title should not be specific to one resource in that case.
Target
The target of a perspective determines two things:
for which set of resources the perspective will be visible in the perspective ribbon
which set of resources will be used for the dynamic scope of the tiles Note about the relation between the perspective's target and the scope of the perspective's tiles: Usually, when you create tiles on a perspective you use a dynamic scope for them that adapts to the currently viewed resource. When you define a perspective's target, you define for which resources the perspective will be available. Since the target determines the resources that can be viewed and the currently viewed resource determines how the dynamic scope is resolved, the target directly affects the scope of those tiles.
this resource only
The perspective will only be visible for the one specific resource you picked, for example one specific VM. This means the perspective won't be visible for any other resources.
Choose this option if you want to create a very specific perspective that is only relevant to one specific resource.
all resources
The perspective will be visible for all resources, no matter their type.
Choose this option if you want to create a very broad perspective that is relevant for every resource.
Resources of type
The perspective will be visible for resources of the specified type. For example, by choosing SQL databases the perspective will be shown for all SQL databases. This option is not shown for resource groups or subscriptions.
Suppress this perspective
Here you can choose the criteria for when the perspective should be suppressed.
A suppressed perspective is hidden from the perspective ribbon by default. The perspective is still available for the resource but users have to click on the arrow button in the perspective ribbon to see it. Suppressing perspectives is helpful to keep the perspective ribbon nice and tidy.
Suppressing a perspective does not change the target, which means the resource still has to match the target for the perspective to be available on the ribbon bar. If it does, the criteria for the suppressed perspective determine if the perspective is visible directly or hidden behind the arrow button.
this resource only
Suppresses the perspective only for the one resource you are currently looking at.
all resources
Suppresses the perspective for all resources, no matter their type.
Graph colors
Graph color matching means that one item (a specific resource, object, site, anything you are displaying in your graphs) is shown in the same color in different graphs on one dashboard or one perspective.
The power of perspectives is that tiles on a perspective can use a dynamic scope. A dynamic scope considers the currently viewed resource. A dynamic scope consists of two different states:
the configuration of the scope in the tile (for example, "consider child objects of type logical disk for the currently viewed object")
the actual resolved scope that depends on which resource you are currently viewing ("this object has 5 child objects of type logical disk")
After configuring the dynamic scope once in the tile, you'll get different results depending how the scope is resolved on the different resources you are viewing.
On perspectives, you can scope tiles to:
this resource (only on perspectives for resources)
The tile's scope will be the resolved to the resource that is currently viewed.
child resources (only on perspectives for resource groups and subscriptions)
When you select this option, the scope of the tile will be resolved to all resources that are in the group or subscription that is currently viewed.
If you want to narrow the scope down to a specific type of resource in the group or subscription, you can filter for one specific type of resource.
other resources
Gives you the normal, non-dynamic scope options you are used to when scoping tiles on dashboards. This means the tile will not dynamically adapt it's content to the currently viewed resource, it will always show data for the static resource picked here.
Since the power of perspectives is that their tiles can show data for different resources depending on what resource is currently being viewed, you should only select this option when you are sure that there is no relationship between the desired scope and the currently viewed resource.
You can change the order of perspectives for an object simply by dragging them to a new position on the perspective ribbon. The first perspective on the far left of the ribbon bar is the default perspective that will be shown first when you navigate to the object.
Navigate to the perspective you want to move.
Click on the edit button
Click on the perspective name on the ribbon and drag it to its new position.
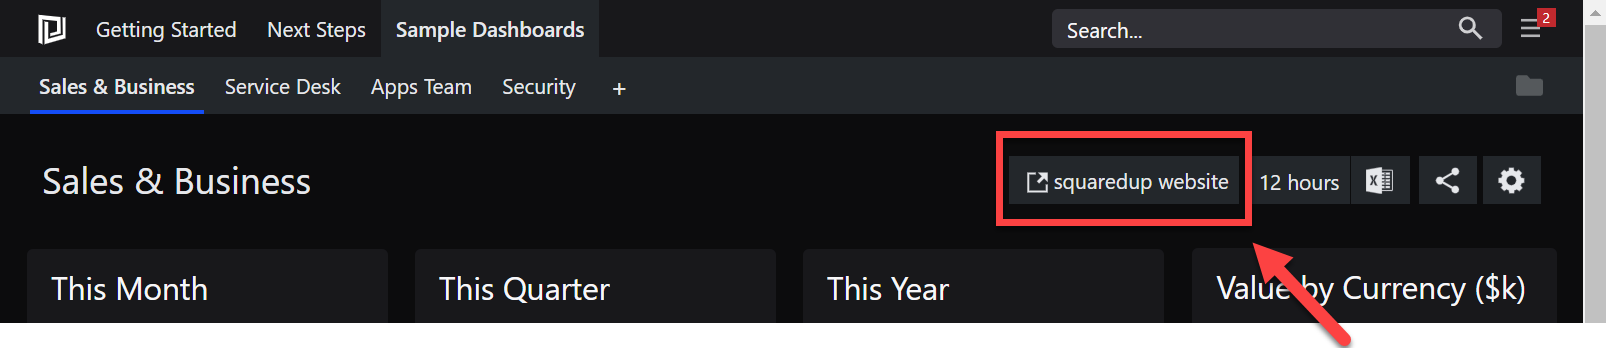
Action buttons are customized buttons that you can add at the top of a dashboard or perspective.
You can choose between different types of actions:
Open an internal link An internal link within your SquaredUp DS instance. For example, when you want to link from an object's perspective to a dashboard that is relevant for that object.Internal links use only the part of the URL that comes after .../SquaredUpv[version number]/. For example, if the full URL to a dashboard is https://mysquaredup.com/SquaredUp/page/dashboard-enterprise-applications, you need to use /page/dashboard-enterprise-applications.
Open a web link A link to any URL. For example, when you have a dashboard for monitoring a website or application, you can add a link to that website or application. Web links have to include the http:// or https:// prefix. These links will open in a new tab by default.
How to add an action button to a perspective
For dashboards: Go to the dashboard where you want to add the action button. For perspectives: If you want to add the action button to a specific perspective, go to a resource that contains the perspective and choose this perspective. If you want to add the action button to all perspectives of a specific type of resource, go to a resource of this type.
Click on the edit button to go into edit mode.
Click on the Edit actions button.
Under Actions, click on the add button.
Enter a name for your new action button.
Select the type of action you want to create:
Open an internal link An internal link within your SquaredUp DS instance. For example, when you want to link from an object's perspective to a dashboard that is relevant for that object.Internal links use only the part of the URL that comes after .../SquaredUpv[version number]/. For example, if the full URL to a dashboard is https://mysquaredup.com/SquaredUp/page/dashboard-enterprise-applications, you need to use /page/dashboard-enterprise-applications.
Open a web link A link to any URL. For example, when you have a dashboard for monitoring a website or application, you can add a link to that website or application. Web links have to include the http:// or https:// prefix. These links will open in a new tab by default.
Only for perspectives: Decide when the action button will be shown. "only show when this perspective is selected": If you leave the checkbox activated, the action button will be visible only on this one perspective. If you deactivate the checkbox, the action button will be visible on all perspectives for all resources of the same type as the resource you are currently viewing.
Click done to save the action button.
You can add more buttons or click done to finish adding buttons.
Click publish to make the changes live. You can now see your newly added action button.
This can happen if the same dashboard pack is imported more than once. The easiest way to resolve this is to delete the duplicate perspectives from SquaredUp DS. This can't be undone, so make sure you have a backup of SquaredUp DS (How to backup and restore SquaredUp DS for Azure).
Click on a duplicated perspective, click the edit button at the top right of the page, and then click the delete button.


 The edit team folder icon is shown next to Team Folders and clicking it will take you to the Team Folder settings page where you can view and sort the dashboards within the Team Folder.
 The view folder button takes you to the folder itself to view or edit that folder.
 The delete button will delete items. This deletes the dashboard or folder and sub-contents completely, not just from the navigation bar. (Admin users can restore deleted dashboards and perspectives from the Recycle Bin